
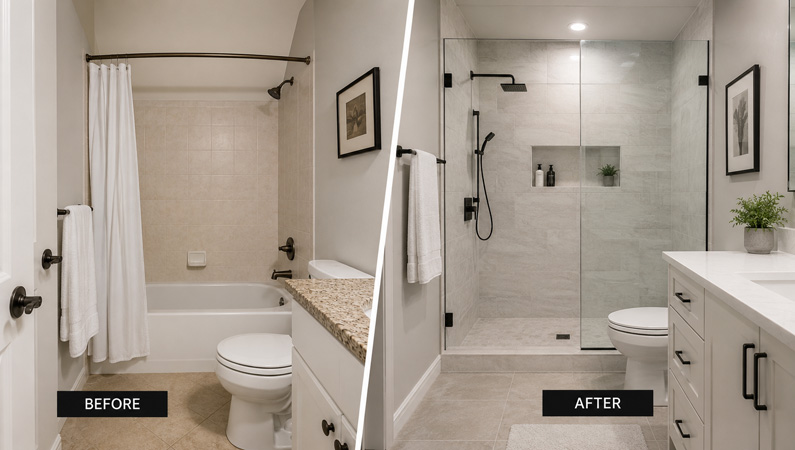
Swapping a bathtub for a walk-in shower is one of the most requested upgrades in Toronto bathroom renovations, but it’s rarely as simple as removing the tub and dropping in a shower pan. Behind the finished glass enclosure sits plumbing, waterproofing, and code work that determines whether the space performs well for years or causes problems down the road.
If you’re weighing this project, it helps to understand exactly what happens between demolition day and your first shower in the new space.
Why Homeowners Make the Switch
Most conversions come down to daily practicality rather than pure style. Common reasons include:
- Aging in place: A step-free entry removes the tub’s high wall, reducing fall risk for older homeowners or family members with mobility limitations
- Faster daily routines: Showers use less water and time than filling and draining a tub
- Small bathroom layouts: An open shower can visually enlarge a cramped space compared to a bulky tub surround
- Resale appeal: In condos and smaller Toronto homes, a well-finished shower often reads as more modern than a dated tub-shower combo
If you’re still deciding between the two options entirely, our walk-in showers vs. bathtubs guide breaks down the trade-offs in more depth before you commit to a conversion.
Step 1: Demolition and Assessment
The existing tub, surround, and often the surrounding drywall or tile come out first. This is also when your contractor checks what’s behind the walls — subfloor condition, the state of the drain line, and whether the wall studs need reinforcement for grab bars or a fixed glass panel.
Older Toronto homes sometimes reveal outdated plumbing or minor water damage at this stage. Catching it now, rather than after the new shower is tiled, is one of the main reasons this isn’t a weekend DIY project.
Step 2: Plumbing and Drain Relocation
A tub and a shower don’t always use the drain in the same position, and shower drains typically require a different slope and trap configuration than a tub drain. Depending on your layout goals, this step may involve:
- Relocating or resizing the drain line
- Adjusting the rough-in for a new shower valve and showerhead height
- Reinforcing the subfloor around the new drain location
- Upgrading old supply lines if they’re not up to current standards
This is also where licensed plumbers matter most — drain and trap work is regulated under the Ontario Building Code, and getting the slope wrong leads to standing water and long-term leaks.
Step 3: Waterproofing and the Shower Base
A walk-in shower has more exposed wall and floor area than a tub, so waterproofing is more extensive, not less. A proper build includes a waterproof membrane behind the tile on all wet walls, a sloped mortar bed or preformed pan directing water to the drain, and, for curbless designs, a linear drain system set into the subfloor.
Skipping or under-building this layer is the single biggest cause of failed shower renovations, since problems often stay hidden until water starts reaching the subfloor or the ceiling below.
Step 4: Framing for Glass and Fixtures
If you’re adding a fixed glass panel or frameless door, the studs around the opening usually need blocking to support the hardware securely. The same applies to grab bars or a built-in bench — these need solid backing installed before drywall or tile goes up, not added after the fact.
Permits and Code Compliance
Because this project relocates plumbing, it typically requires a plumbing permit from the City of Toronto, along with inspections at the rough-in and final stages. Toronto’s plumbing and drain permit requirements outline what’s needed for this kind of work, and all of it must meet the standards set out in the Ontario Building Code. A licensed contractor manages this process and schedules inspections so the work is signed off correctly.
Timeline and What to Expect
A straightforward tub-to-shower conversion in an otherwise sound bathroom generally takes one to two weeks, factoring in:
- Demolition and disposal
- Plumbing rough-in and inspection
- Waterproofing cure time before tiling
- Tile installation and grout curing
- Glass, fixtures, and final walkthrough
Layouts that involve moving walls, upgrading electrical for new lighting, or addressing subfloor damage will extend that timeline. Our bathroom remodel planning guide walks through how to sequence a project like this if you’re renovating the rest of the room at the same time.
Getting It Done Right
A tub-to-shower conversion touches plumbing, waterproofing, and structural framing in a small footprint, which is exactly why it rewards experienced hands. iRemodel Home Renovation Toronto handles the permitting, licensed trades, and code-compliant waterproofing this project depends on, backed by a one-year workmanship warranty on the finished work.
If you’re considering this upgrade for your Toronto home, get in touch for a free consultation and we’ll walk through what the conversion looks like for your specific bathroom.
About the Author